Thursday, 26 October 2017

Pokemon Go Generations

Pokemon go Generations

Lets first know about what are these Generations.
The Pokémon franchise revolves around 805 fictional species of collectible monsters, each having unique designs and skills. Conceived by Satoshi Tajiri in early 1989, Pokémon are creatures that inhabit the fictional Pokémon World. The designs for the multitude of species can draw inspiration from anything, such as inanimate objects, real-world animals, or mythology. Many Pokémon are capable of evolving into more powerful species, while others can undergo form changes and achieve similar results. Originally, only a handful of artists led by Ken Sugimori designed Pokémon, however, by 2013 a team of 20 artists worked together to create new species designs. Sugimori and Hironobu Yoshida lead the team and determine the final designs. Each iteration of the series has brought about praise and criticism over the numerous creatures.
The vast array of creatures is commonly divided into "Generations", with each division encompassing new titles in the main video game series and often a change of handheld platform. Generation I refers to RedGreenBlue and Yellow; Generation II refers to GoldSilver, and Crystal; Generation III refers to RubySapphire, and Emerald; Generation IV refers to DiamondPearl , and Platinum; Generation V refers to BlackWhiteBlack 2, and White 2, Generation VI refers to X and Y; and Generation VII refers to SunMoonUltra Sun and Ultra Moon. Each Generation is also marked by the addition of new Pokémon: 151 in Generation I, 100 in Generation II, 135 in Generation III, 107 in Generation IV, 156 in Generation V, 72 in Generation VI, and 81 in Generation VII.
Due to the large number of Pokémon, listing of each species is divided into articles by generation. All 802 Pokémon are organized by their number in the National Pokédex—an in-game electronic encyclopedia that provides various information on Pokémon. The National Pokédex is subdivided into regional Pokédex series, each revolving around species introduced at the time of their respective generations along with older generations. For example, the Johto Pokédex, Generation II, covers the 100 species introduced in Gold and Silver in addition to the original 151 species. The encyclopedias follow a general ordering: starter Pokémon are listed first, followed by species obtainable early in the respective games, and are concluded with Legendary and Mythical Pokémon. Generation V is a notable exception, as Victini is the first Pokémon in the Unova Pokedex and is also uniquely numbered as number 0.

CONCEPT


The premise of Pokémon in general was conceived by Satoshi Tajiri—who later founded Game Freak—in 1989, when the Game Boy was released. The creatures that inhabit the world of Pokémon are also called Pokémon.[1] The word "Pokémon" is a romanized contraction of the Japanese brand Pocket Monsters (ポケットモンスター Poketto Monsutā). The concept of the Pokémon universe, in both the video games and the general fictional world of Pokémon, stems most notably from Tajiri's childhood hobby of insect collecting. Other influences on the concept include Ultramananime, and playing video games in general. Throughout his early life, Tajiri saw his rural, nature-filled hometown (Machida, Tokyo) transform into an urban center. The urbanization of his town drove away wildlife and he and others living in the area were eventually unable to collect insects. Through Pokémon, Tajiri sought to bring back this outdoor pastime and share it with the world.[1] The first games in the franchise, Red and Green, were released on 27 February 1996 in Japan for the Game Boy; the games saw an international release as Red and Blue in September 1998. The ability to capture, battle, trade, and care for numerous creatures catapulted Pokémon to international popularity and it has become a multibillion-dollar franchise and the second-best selling video game series, only behind the Mario franchise.
At the start of a main series Pokémon game, the player character receives one of three "starter" Pokémon, with which they can battle and catch other Pokémon. Each Pokémon has one or two "types", such as FireWater, or Grass. In battle, certain types are strong against other types. For example, a fire-type attack will do more damage to a grass-type Pokémon than a water-type attack. This form of gameplay is frequently compared to that of rock-paper-scissors, though players have to strategize which Pokémon and which of their attacks to use against various opponents.
Many species of Pokémon are capable of evolving into a larger and more powerful creature. The change is accompanied by stat changes, generally a modest increase, and access to a wider variety of attacks. There are multiple ways to trigger an evolution including reaching a particular level, using a special stone, or learning a specific attack. For example, at level 16 Bulbasaur is capable of evolving into Ivysaur. Most notably, the Normal-type Eevee is capable of evolving into eight different Pokémon: Jolteon (Electric), Flareon (Fire), Vaporeon (Water), Umbreon(Dark), Espeon (Psychic), Leafeon (Grass), Glaceon (Ice), and Sylveon (Fairy). In Generation VI, a new mechanic called Mega Evolution—as well as a subset of Mega Evolution called Primal Reversion—was introduced into the game. Unlike normal evolution, Mega Evolution and Primal Reversion last only for the duration of a battle, with the Pokémon reverting to its normal form at the end. Forty-eight Pokémon are capable of undergoing Mega Evolution or Primal Reversion as of the release of Sun and Moon. In contrast, some species such as CastformRotomUnown, and Lycanroc undergo form changes that may provide stat buffs or changes and type alterations but are not considered new species.
Though the Pokémon franchise is primarily intended for younger players, each Pokémon has various complex attributes such as natures, characteristic traits, Individual Values (IVs), and Effort Values (EVs). These, according to Game Freak Board Director Junichi Masuda, are intended for people "who enjoy battling and want to go more in depth". These individual statistics were also included because the basic concept of the franchise is to train one's Pokémon. Designer Takeshi Kawachimaru stated that IVs and EVs "help to make each Pokemon in the game individual", as it adds unique aspects to them. Each Pokémon game introduces a few "Legendary" and "Mythical" Pokémon that are powerful, rare, and hard to catch. Pokémon Sun and Moon introduced "Ultra Beasts", which are described as "beings from another dimension" that appeared in the Alola region and are similarly powerful and rare.

Design and development

The evolution mechanic is most prominently displayed through Eevee (center)and its eight evolutions, collectively referred to as "Eeveelutions". Each one requires a different method to evolve and prominently represent the new type they don.
Throughout development of Red and Green, all Pokémon were designed by Ken Sugimori, a long-time friend of Tajiri, and a team of fewer than ten people, including Atsuko Nishida who is credited as the designer of Pikachu. By 2013 a team of 20 artists worked together to create new species designs. A committee of five people determine which designs are incorporated into the games, with Sugimori and Hironobu Yoshida finalizing the look of each creature. Furthermore, Sugimori is responsible for the boxart legendary Pokémon and all of the official artwork for the games. According to Yoshida, the number of rejected Pokémon designs is five to ten times more than the number that are finalized in each game. In rare cases, rejected designs are brought back and released in a later generation. Shigeru Ohmori, director of Sun and Moon, admitted that creating new Pokémon has become a difficult task with the sheer number of creatures designed over the franchise's 20-year history. Each iteration of the series has brought about praise and criticism over the numerous creatures.
The designs for Pokémon are often highly analogous to real-life creatures, but also encompass inanimate objects. Director Junichi Masuda and graphic designer Takao Unno have stated that inspiration for Pokémon designs can come from anything. The variety of animals and culture across the world provide the basis for countless ideas to be incorporated into the franchise. The environment a Pokémon would live in is taken into account when they are designed. The lei-like Comfey fits appropriately in the Hawaii-inspired Alola region of Sun and Moon. Masuda has stated that each element of a design has a functioning reason. In some cases, the design team creates a footprint that a Pokémon could make and designs a creature around that. Some designers look to game mechanics for inspiration, seeing where particular typing combinations could be interesting. Typing assignment varies during the design process, sometimes a Pokémon receives a type after it is created and other times they are designed around a particular type.
The simpler roots of designs in Generation I prompted greater complexity in later games. Designs, in general, have become increasingly complex and thematic in newer games. Sneasel, for example, draws inspiration from the Japanese yōkai kamaitachi, mythical creatures with fast, razor-sharp claws that hunt in packs. These elements are all found in Sneasel's design and characteristics. New Pokémon introduced in Generation VI, for example, are heavily influenced by the culture and fauna of Europe (namely France). However, by the release of X and Y in 2013, Sugimori stated he wishes for Pokémon design to return to the simpler roots of the franchise.
Masuda considers the starter Pokémon to be among the most important in the franchise; Yoshida goes further and calls them "the face of that generation" and says that "they're the ones that should be on the packaging". The three starter Pokémon of each generation are Grass-, Water-, and Fire-types, a trio that Masuda considers to be the easiest to understand for new players. In an interview with GamesRadar in 2009, Masuda stated that simple Pokémon take around six months to design and develop, whereas Pokémon that play a more important part in the games (such as starter Pokémon) may take over a year. Masuda added, "We also want the designer to have as much freedom as possible, we don't want to narrow down their imagination by saying 'We want this kind of Pokemon.' When we talk to the designer we always stress that they shouldn't think of Pokemon necessarily, but should instead just be as creative as they can." After the Pokémon is designed it is sent to the "Battle Producer", who decides which moves and stats the Pokémon should have.

In the official game of pokemon go it has recently released gen 3 Pokemon's like sabyle, duskull etc.
Niantic released them during the Halloween Event of 2017. 

Tuesday, 24 October 2017

How To Use HitLeap Effectively

Use HitLeap Effectively

Image result for hitleap images

HitLeap is an online traffic exchange program that lets you put your links out there for people to view while you simultaneously visit their links. It is quick, easy and safe -- and very good for earning not only hits to your website but also bitcoins and cash. Here is a quick how to on how HitLeap works and how you can use it to its fullest potential.

How to Use HitLeap (In General):
  1. Go to HitLeap and make an account for yourself. On the front page is a graph that shows you how many minutes you've earned and how many clicks you've gotten. This graph updates as you work.
  2. If you have a website ready for use, submit it under 'My Websites'. You can set the viewing time to whatever you feel like it and whatever will suit your needs the best. HitLeap will list your link as 'under review' for about ~five to ten minutes, after which it will be added to the Traffic Exchange.
  3. To get clicks on your site you will need to spend 'minutes' which you can earn in 'Traffic Exchange'. You have two options in earning minutes: 
    1. Download the HitLeap Viewer (which runs a bit more smoothly and earns you more minutes but is a desktop aplication you must install.)or 
    2. Using the Viewer in browser.
  4. Whichever option you've chosen to use, you will now be earning minutes from it! Those minutes will automatically be spent getting you hit
To Earn Paypal Cash:
  1. Head on over to adf.ly (or another link monetizer) and create an account for yourself.
  2. Shorten any url that you want and take that shortened url on over to HitLeap.
  3. Repeat the above steps to put your link into the Traffic Exchange there you go!
  • NOTE: Use this method with caution, as adf.ly could potentially ban your account for false attempts at gaining link traffic (since very few will click the 'next' button on the ad.) 
  • If you plan to use this method, try setting your adf.ly link to the banner advertising and not the full page ad. The banner requires no clicks and therefore is less likely to be flagged as fake traffic.
  • You can also do what many others do and buy HitLeap premium, which allows you to set "from where" the traffic is coming, ie. Facebook, Twitter, etc. Many people have had good luck with this.
                            
To Earn Bitcoins:
Image result for bitcoins
  1. Head on over to Bitbin.it and create a new 'paste'. Type whatever you want into the box, referral links to faucets, websites like freebitco.in, or even a simple hello! I usually post my GiftHulk FOY codes there and then share the links around.
  2. Fill out the information below the and then click 'Earn Bitcoins'. This is how you can monetize your paste and earn BTC for it. You get paid for the number of visitors who come to your paste. Put your wallet address in, and then click 'Submit Paste'.
  3. Take the url of your paste on over to HitLeap.
  4. Repeat the steps from the general how to to put your link into the Traffic Exchange and there you go!

How to start your own blog.

So you want to start a blog. That’s great! Not only is blogging a great pastime, but with a blog you can express yourself in a unique way, help others with problems you’ve overcome, establish yourself as an expert, and even make money.
If you’re new to blogging, it really helps to get started off on the right footand have someone to help you avoid mistakes.
That’s why I’ve put this page together for you, to give beginners a fast, full proof guide to starting a blog, without having to learn HTML or waste your time reading long, boring tutorials. In fact, over 9,500 people have already setup blogs using this guide!
I’ve put this guide together for you, to walk you through the process to setup your blog in 5 easy steps.

Here’s how to start a blog:

  1. Choose a blogging platform.
  2. Register a domain name and hosting.
  3. Design your blog.
  4. Add posts and pages.
  5. Start growing your blog.
The goal of this page is to help you get started the right way. From years of coaching and helping people with their blogs, I’ve found that many people make mistakes when starting a blog, sometimes resulting in them abandoning the project altogether. We don’t want that to happen.
So I want you to take the time to thoroughly read this post. It’s about 4000 words long (20 minutes), so get comfy and set aside some time; I’m going to walk you through the entire process of setting up your self-hosted blog, so you ‘get it right the first time’. And if you already have a blog, sign up for my FREE course below for great tips on how to get readers, establish yourself, and even make money!
Ready to create your blog today? Alright, let’s get right into it.

Step 1: Choose the right blogging platform (WordPress)


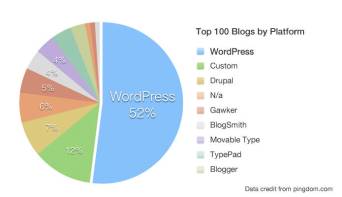
Before you can even start worrying about how your blog will look like, you’ll need to choose your blogging platform. WordPress, Tumblr and blogger market share
There’s a lot to choose from. You are able to create a blog with many different blogging platforms, such as WordPress, Tumblr, Blogger and more…
However, given that there are over 72 million active users using WordPress today, it’s clear which platform is the boss. Even my own blogs and sites are built with WordPress blogging platform. Here’s why:
  • It’s FREE for everyone to use (including themes, layouts and add-ons that many other blogging platforms don’t provide).
  • It’s super easy to set up.
  • It’s secure; WordPress is always updating their software and keeping everything sound and secure, so there’s rarely a worry of having your blog come under hacking attacks. No wonder Facebook, NASA and even university blogs are using WordPress.
  • It’s HIGHLY customisable. There are hundreds of free themes and plugins that add more functionality to your blog, from contact and subscribe boxes to plugins that improve blog performance and more.
While the other blogging platforms are generally all pretty OK, nothing in my opinion has ever come close to matching the freedom and customization options that WordPress offers. So without a doubt, go with WordPress. Especially when you are just starting out.

Why you shouldn’t create a blog on a free blogging platform

Without a doubt, you need to self-host your WordPress blog.
Think about it – what famous, successful blogger you know is using a free blogging website like “startbloggingonline.freeblogs.com” instead of their own domain name like “StartBloggingOnline.com”, for example?
It’s not just that – free blogging platforms have other problems too – including…
  • You don’t control your content – the blogging platform does. They could shut you down any time, and for any reason. Don’t believe me? Read this.
  • The web address of your blog will be long and hard to remember(like yourfreeblog.blogspot.com) instead of a catchy, branded address you choose.
  • You’re not allowed to advertise on most free blogging platforms, making it much harder to ever make money from blogging.
All of these limitations apply to the WordPress.COM blogs. What you really want is to self-host a WordPress blog – it’s the same software without all the limitations!
If I were you, I’d start with a self-hosted blog on my own domain from day one. Setting up a blog like this is WAY easier and less expensive than you think.

Finding a domain name and web hosting provider

Now to exciting part! To set up a self-hosted blog on your own domain name, you’ll need two things:
Domain name – This will be your personal blog address where people find you over and over again. For example Google’s Domain is www.Google.com. Your new blog domain name will be www.YourBlogName.com, except you’ll choose what’s going to be behind YourNewBlog. The cost of a domain name is usually $10/year, but if you follow this guide all the way, I’ll show you how to get one for much cheaper.
Web hosting – This will be the home of your blog address and content that’s on the blog. Without web hosting, you’ll be unable to use your domain. Think of it as a computer hard drive that stores all your content on your blog (images, blog posts and so on). The cost of web hosting is usually somewhere between $2-5 per month.
It’s less than an XL coffee at Starbucks, so it won’t break the bank. But it’s an important investment to your blog success.

Where should I get my domain name and hosting?

When it comes to hosting, there are only two things that matter.
  • Page load speed – The average amount of time (in seconds) it takes your blog to load.
  • Uptime – 99.9% isn’t enough (it’s 42 minutes of downtime per month). You should be aiming for 100%.
There are hundreds of different web hosting providers. They all offer you a similar service (domain + hosting) with a similar price, but since I’ve dealt with and monitored many famous and recommended web hosting companies like Bluehost, iPage, Godaddy etc…
I now only use and recommend www.HostGator.com for domain names and web hosting.
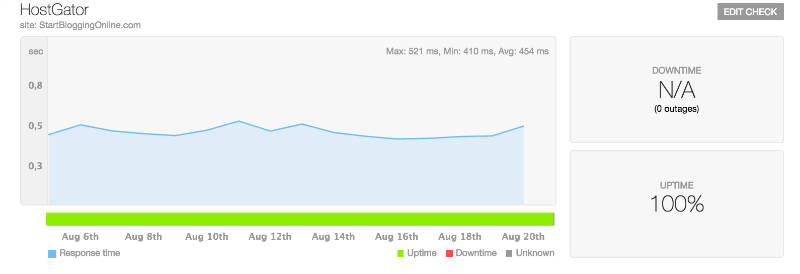
Why? Nothing has ever come close to HostGator in terms of blog load speed and uptime (see below):
My blog hosting performance
HostGator has great performance, they are easy to use and it’s probably the best pick for beginners.
However, you can always go with another web hosting as long as it’s fast, reliable and offers unlimited storage & bandwidth. This helps you to avoid problems later on.
Now that we’ve gone through the basics of blogging platforms, it’s time to start walking the walk! With the next step, we’ll get your blog set up and running. If you’re not ready yet because you still need to think of a domain name or can’t set up a blog right away, that’s okay. Click here to sign up so that when you’re ready, you can pick up right where you left off.

Step 2: Set up a Blog on your own domain name (self-hosted WordPress)


If you don’t have a hosting or a domain name yet – don’t worry. I’ll be showing this in a minute…
At the end of this step (2), you will have a fully working self-hosted WordPress blog on your own domain name! Sounds promising, huh?
If for some odd reason you don’t want to use HostGator, you can always choose another hosting provider. I can’t promise they’ll be that good, but the registration and the set up process should be some what similar. Some hosting companies do not have one click install for WordPress. If that’s the case, see this guide for installing WordPress manually (not recommended for beginners, though).

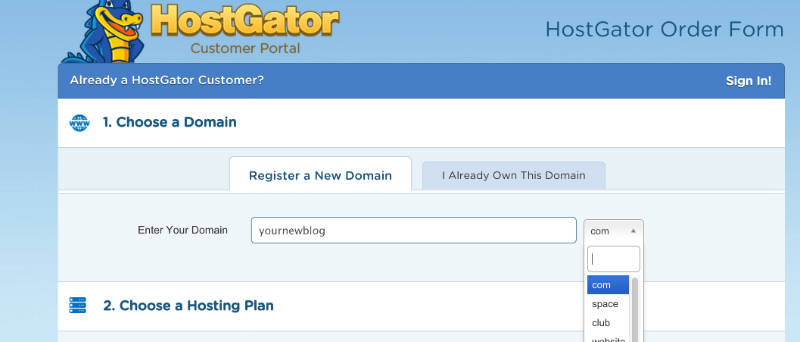
1. Go to www.HostGator.com and then click “Start Your WordPress Blog”.

Remember: Since I’m using HostGator by myself too, I’ve negotiated a discount for people who use this guide (72% off). This discount should be applied automatically. Enjoy 🙂
Hostgator landing page

2. Pick a Domain name for your blog

Already have a domain name?Just write it in the right box (I already own this domain) and keep moving to the next step by scrolling down a bit.
How do I choose a good domain name?
Choosing a bad domain name is one of the most common mistakes I see bloggers make. Be sure you choose a domain name that is…
1. Easy to Remember – Don’t choose a nonsense name, something tough to spell, or a long name full of dashes. “www.best-tech-gadgets-in-the-world.com” won’t ever stick in someone’s head, but something like “www.techgeeks.com” rolls off the tongue.
2. Unique and Descriptive – You want a name that reflects who you are and what you care about. Be creative and build an identity you’re excited about!
3. Trustworthy – Domain extensions like “.com”, “.org” or “.net” are the most popular, with “.com” being the one most people think of first. Try to avoid crazy extensions like “.rocks” or “.biz”, as these are less commonly used, tougher to remember and not as trusted.
Type the domain name you want to use in the box, then click “next”. If the name is available, you’ll be able to claim it. If it’s not available, choose another one.
Your_Blog_Domain
If the name you want isn’t available, HostGator will show you some alternatives that are similar – or you can punch in a new name and try again. I’d suggest you to use something that ends with .com, .net or .org

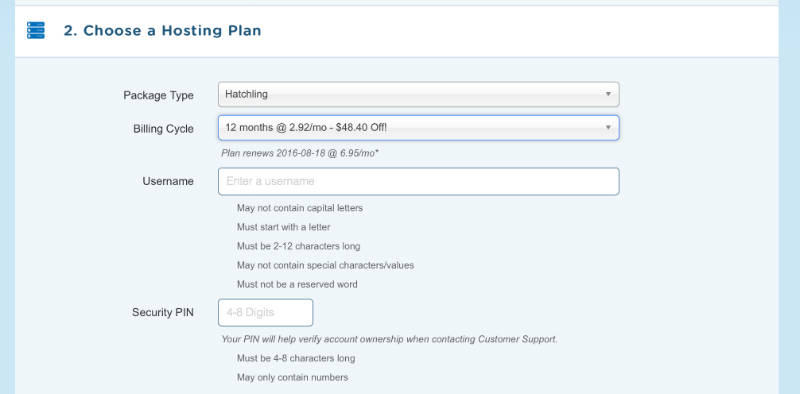
3. Choose your blog hosting plan

I recommend the “Hatchling” plan for now – you can always upgrade later if you decide you want more advanced features, but you get more than enough with the Hatchling.
choose_blog_hosting_plan

4. Complete your registration

Once you’ve chosen Hatchling plan and found a name you like that’s available, you’ll need to register it by putting in your contact and billing information.
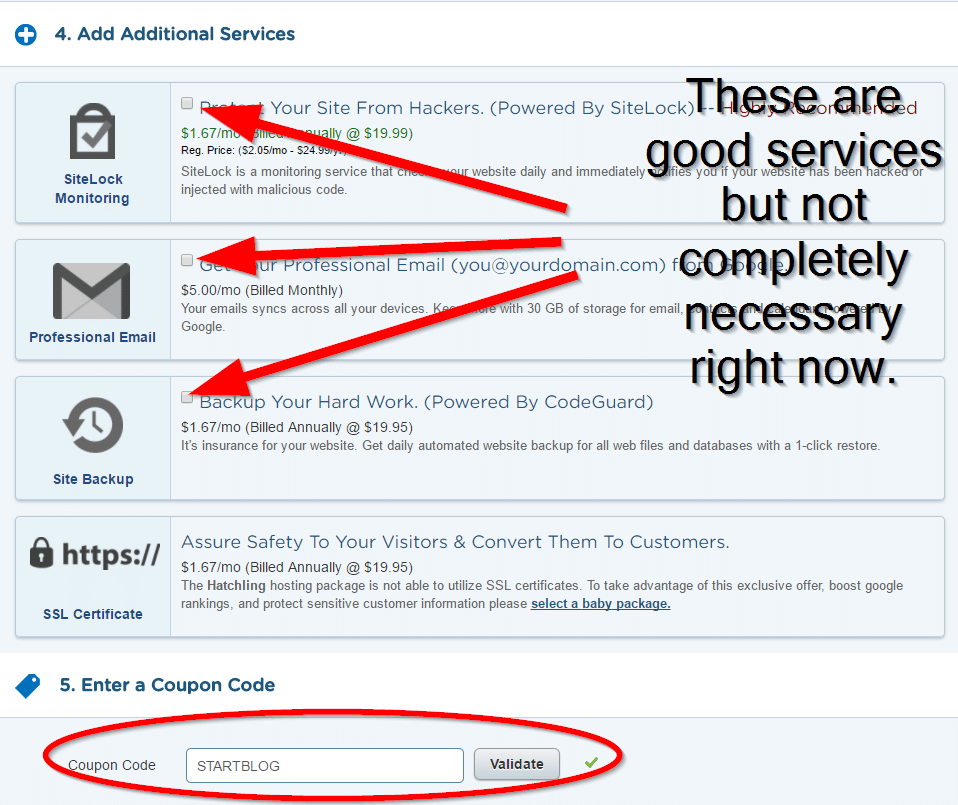
You’ll also have a chance to customize your package a bit. This is a chance to save some more money, so don’t skip it! Apply discount code “STARTBLOG”
extra services for hg signup


I would take a look at each of these additional services to see if you want any of them.  I don’t believe they are necessary for you at this stage.

5. Log in to your new account and install WordPress blog

It may take a few minutes for HostGator to register your account, so be patient. You should get a confirmation email when your account is ready.
Once you’ve logged in to your control panel (all the information you need for that should be on your inbox) , it’s time to install WordPress. Thankfully, this takes just one click!
  • Log-in to your Hostgator control panel
  • At the top click “Get Started With WordPress Today”
  • If WordPress isn’t there for some reason, scroll down a little bit on the control panel and click on “Quick Install” under the Software & Services section. Look at the top of the page, in the left sidebar section for WordPress.
Once clicked, you’ll be automatically transferred to Mojomarketplace.com – don’t panic, this is just a site that helps HostGator install platforms (like WordPress).
You should immediately see a screen where you’re offered to “Install” or “Import” WordPress.
Click “Install” to get to the next step.
When you’re finished, “Install WordPress”. Once you’ve done that, you’ll see a loading bar at the top of your page that will eventually tell you that your WordPress blog has been installed and you’ll see your log-in credentials.
blog_install_finished

6. Log in in and check out your new blog

Once the installation completes, you’ll get an email that shares your login information, including an “Admin URL”. (In case you missed that notification bar)
To log in to your blog, click the admin URL. If you forget this URL, it’s simply www.yourblog.com/wp-admin (where “yourblog” is your domain name).
New Blog Homepage (1-6 steps)
Congratulations – you now know how to make a blog using WordPress. You’ve installed WordPress and set up your blog, all on your own! As you can see, it was really easy and straightforward.
Now that your blog is set up, sign up for my FREE blogging course for tips on how to get readers, earn money, and personalize your blog. Or read on to learn how to design your blog and make your first post.

Step 3: Designing your blog


In this section, I’ll show you some WordPress blog basics, including:
WordPress blog
Sample of a customized WordPress blog (SmartPassiveIncome.com)
  • Changing your blog’s design
  • Installing new plugins/features
  • Making your blog search engine friendly
If you’ve set up your blog, you’re now ready to start using WordPress and customizing your blog. I promise – it’ll be pretty easy and fun at the same time.
Remember: You can log in to your blog by going to www.yourblog.com/wp-admin/ and using the credentials you set up with HostGator or any other hosting company you used.

Changing Your Blog’s Design (Themes & Layouts)

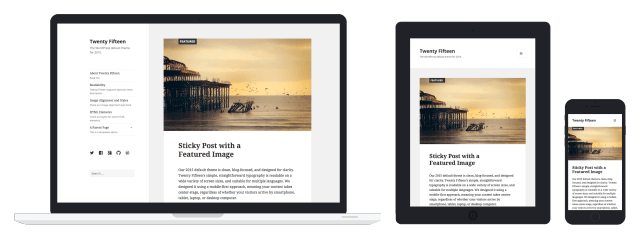
WordPress blogging platform uses design templates called “Themes” to figure out how your site should look. Changing your blog’s layout and design is as simple as installing a new theme.
There are over 2,000 professionally designed, fully-c
ustomizable and free themes to choose from – so you’ve got a lot of options. If you want to see premium themes and designs like the Genesis Framework, head over to Themeforest.net

Here’s how to find and install a theme you love:

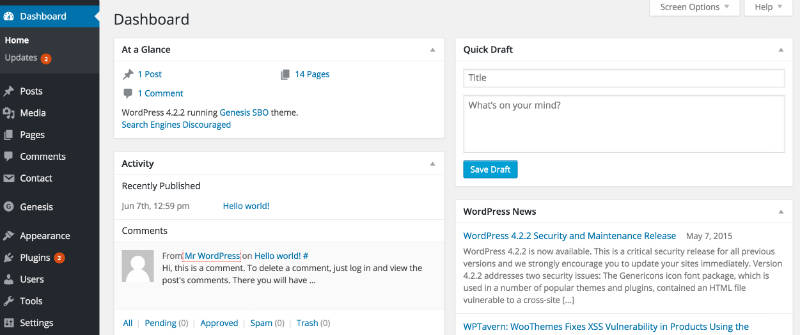
When you log in for the first time, you’ll see a dashboard or admin panel that looks something like this:
Your_WordPress_dashboard

Mouse-over the “Appearance” tab in the WordPress sidebar, then click on “Themes”.
find_a_perfect_theme

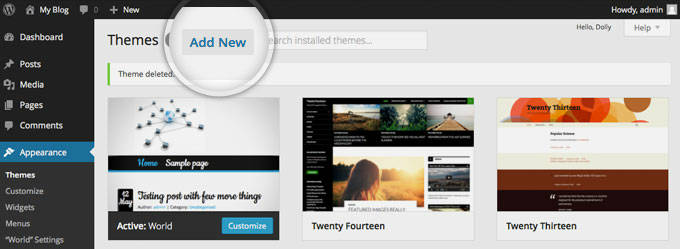
On the next screen, you’ll see several themes are already installed. If you don’t like those, click the “Add New” button at the top, or the great big “Add New” square to start searching for a theme.
add_new_theme
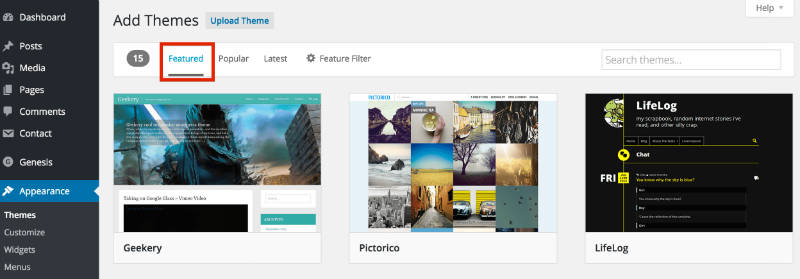
Now, you’ll see tabs where you’ll find featured, popular and brand new themes, as well as a “Feature Filter” and search bar.
featured_themes

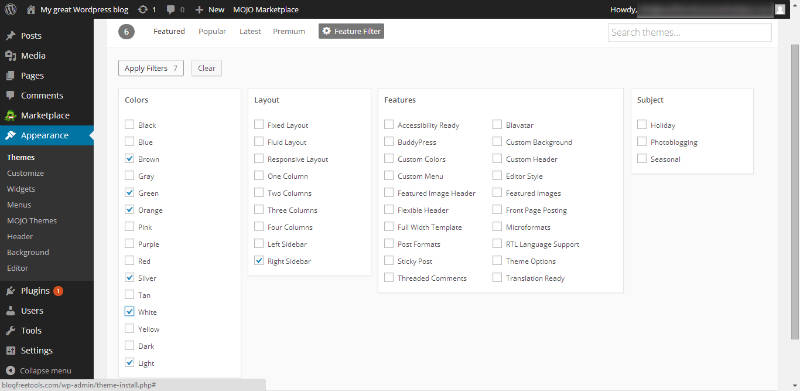
I really like the “Feature Filter” option, because you can choose themes in certain color schemes, select specific layouts and even choose themes with built-in advanced features.
Just choose the options you want, then click “Apply Filters” on the left hand side. If you’re finding this challenging, just search by keyword – there’s no wrong way!
apply_filters

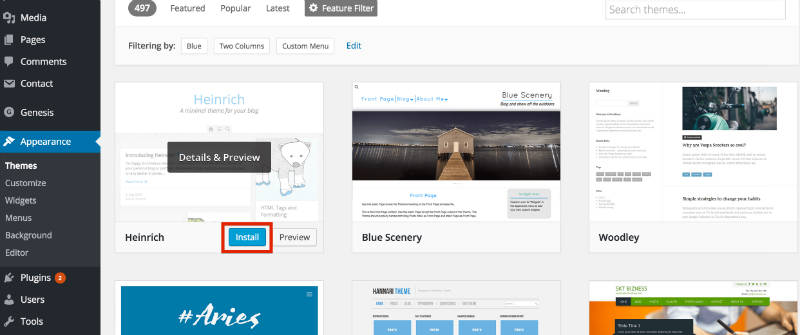
When you’ve found a theme you like, click “Install”. You’re nearly done!
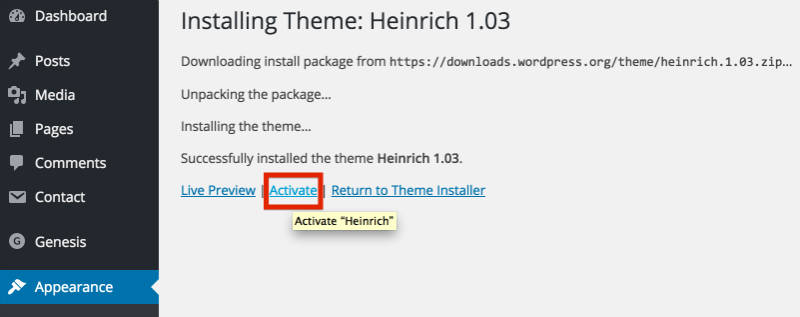
Once the theme has been installed, all that’s left to do is click “Activate” on the next screen:
activate_your_blog_theme

Configuring your blog to be search engine friendly

There are some things you’d need to do to make your blog more search engine friendly. Search engines do not like two things:
  1. Ugly and clumsy URL-s – http://yourblog.com/2012/04/topic-a/author-Karen/how-to-start-a-blog. A much better way is to use: http://yourblog.com/start-a-blog
See the difference? One is filled with irrelevant information and the another one is short, clean and neat.
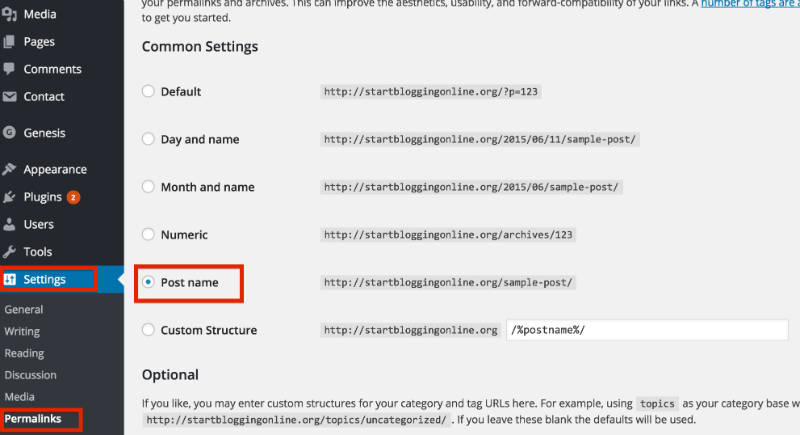
In order to change your links to a more cleaner, click on the “Settings” -> “Permalinks” and use the following settings:
permalinks

2. Spam comments – Unfortunately, lots of people want to leave automate spam comments on your blog. They do that for couple of reasons – to get people from your blog to their blog and to advertise their services/products.
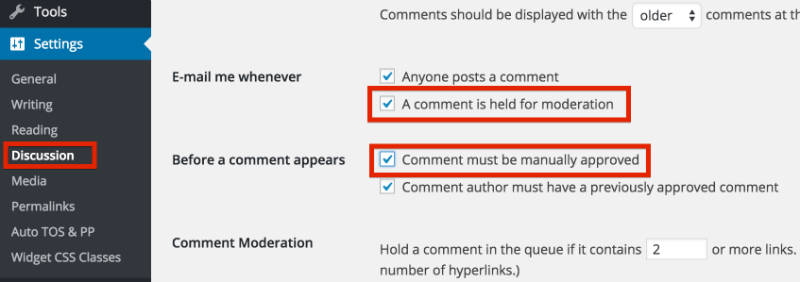
To avoid that, make sure you moderate your comments. Here’s how to do that: Go to “Settings” -> “Discussion” and tick those two options.
disable_comments


Step 4: Adding/Writing Blog Posts and Pages


By now you should have fully working WordPress blog on your own domain name. You should also have a custom blog theme that fits with your blog’s topic. Congratulations – you’ve done a LOT and I’m proud that you’ve managed to get so far.
In the LAST step, I’ll show you how to write your first blog post and share some tips for writing blog posts.
In this section, I’ll show you…
  • How to write a post inside WordPress
  • How to add images, links and format text
  • Some quick tips and tricks for writing great content

Using WordPress to Blog

Adding a New Post

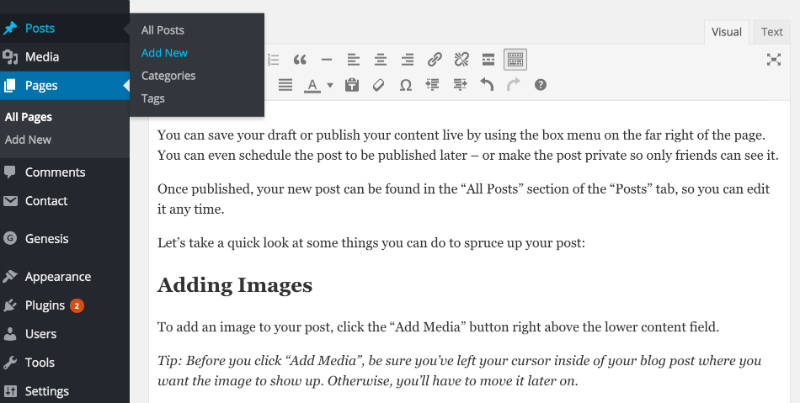
To add a new blog post, click the “Posts” section on the left hand side-menu, then click on “Add New”.
Adding_a_new_blog_post
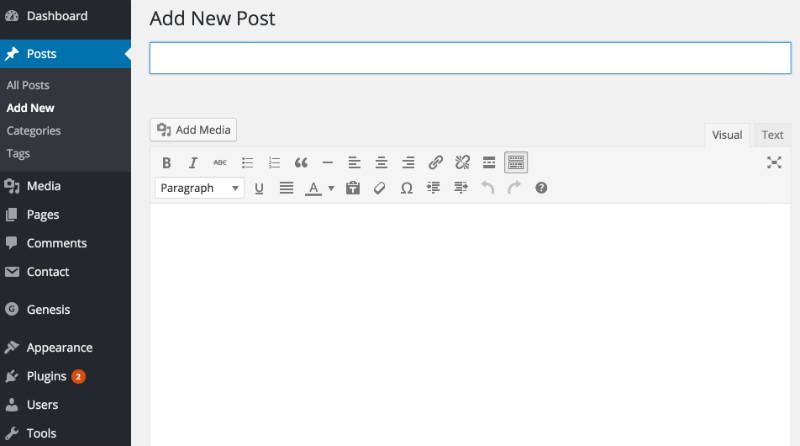
On the next screen, you’ll see something like this:
Writing new blog post
You can add the title to your blog post in the top field, and your content goes in the big text box below the title.
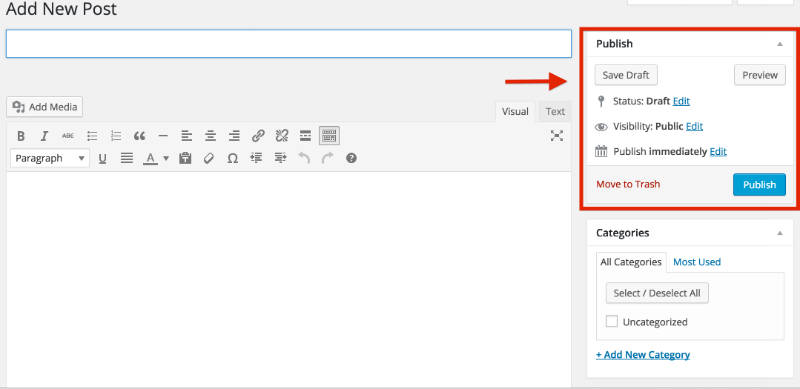
You can save your draft or publish your content live by using the box menu on the far right of the page. You can even schedule the post to be published later – or make the post private so only friends can see it.
BlogPost_status_visibility
Once published, your new post can be found in the “All Posts” section of the “Posts” tab, so you can edit it any time.
Let’s take a quick look at some things you can do to spruce up your post:

Adding Images

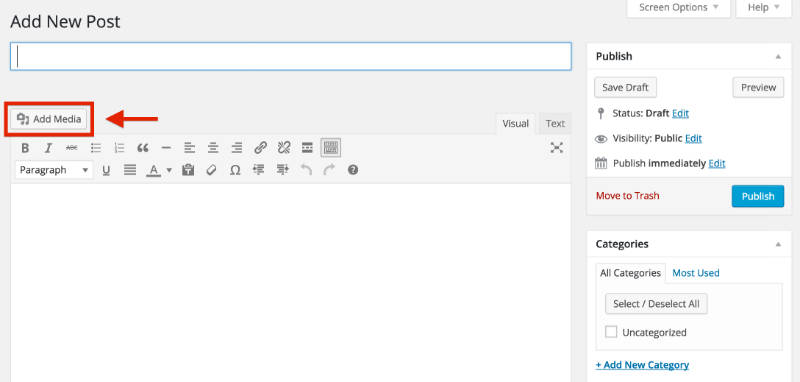
To add an image to your post, click the “Add Media” button right above the lower content field.
Tip: Before you click “Add Media”, be sure you’ve left your cursor inside of your blog post where you want the image to show up. Otherwise, you’ll have to move it later on.
Adding_media

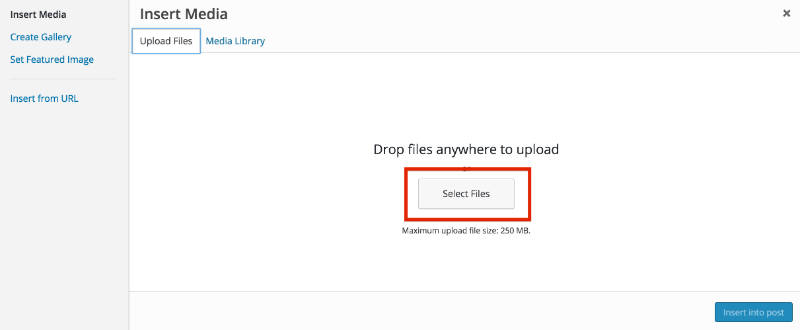
Next, click the “Upload Files” tab on the screen that pops up, then click “Select Files”.
adding_images_blog_post
Once you’ve found the file, double click it and WordPress will upload it automatically.
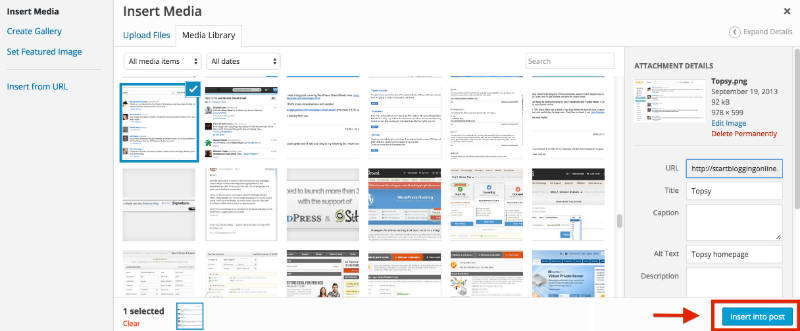
When the upload is finished, make sure the image you want is selected, then click the “Insert into post” button to add the image to the post you’re writing.
insert_image_into_blogpost

Adding a Link

Linking out to other websites is a great way to build relationships and share interesting content.
To add a link, click on the icon in the toolbar that looks a bit like a chain link.
instert_a_blog_link
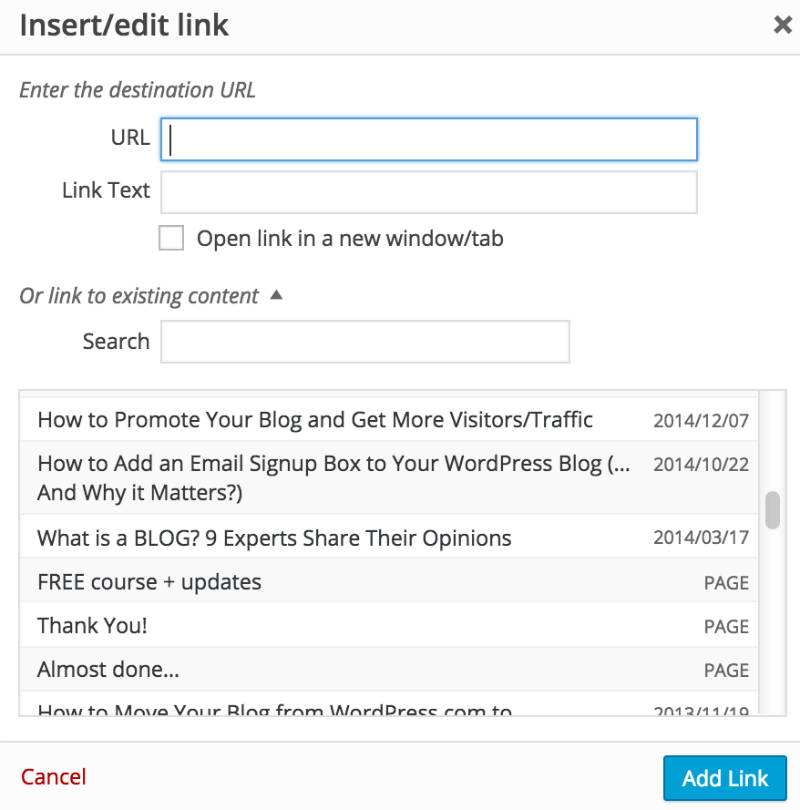
On the pop-up, you’ll need to enter a few important bits of information.
Adding_link2
  • URL is the web address of the link you want to share. Make sure you include “http://” before the “www.” address, or your link will be broken.
  • “Link Text” is the text you want people to click on to get to your link. It might be “Click here”, or anything you choose.
  • “Open link in a new window/tab” – it’s a smart idea to check this box. Otherwise, when someone clicks your link, they’ll leave your blog.
  • If you want to link to an existing page, you can use the “Search” section to find a post or page you’ve already created and click it to add a link.
Finally, click “Add Link”, and your link will be added where you left your cursor in the post you were writing.

Adding Headers & Editing Text

It’s a good idea to use headers and bolding to make your content easier to read and scan.

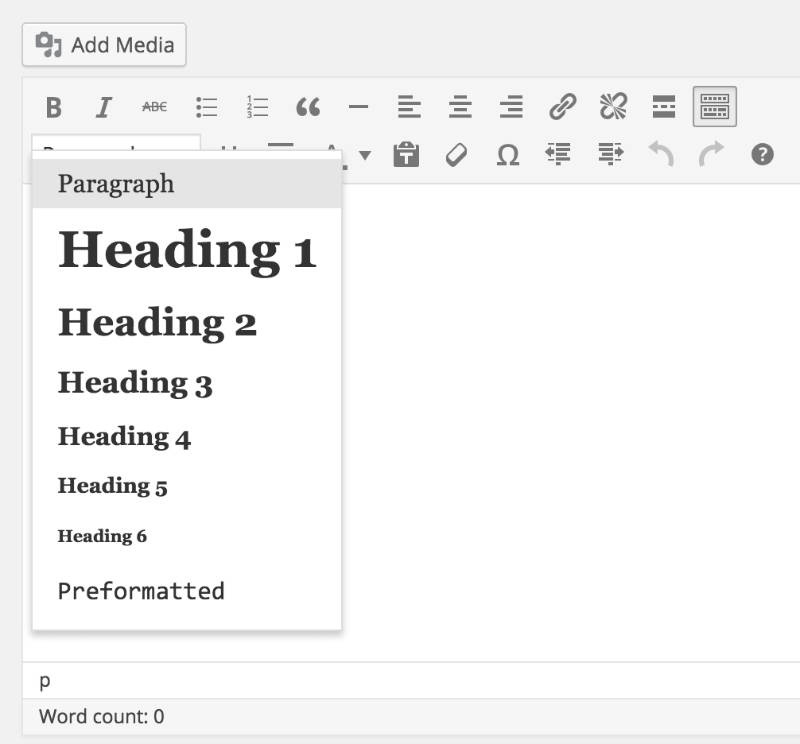
Adding Headings

To add a heading, click on the drop-down menu on the bottom left of the toolbar.
Blog_Post_Headings
Try to only use “Heading 1” once within your page (usually at the top), and use “Heading 2” or “Heading 3” for other sections in the copy, as this is better for search engines.
Tip: You can also highlight the text you want to change in your blog post, THEN click on the dropdown menu and select the format you want the text to be in.

Editing Fonts

You can also bold, italicize, underline and even change the colour of your text in a click or two.
change_font
  • “B” is for bolding
  • “I” is for italics
  • U” is to underline your text
  • A” will open a dropdown menu where you can select font color
As you can see, this is all pretty simple for someone who has worked with Microsoft Word.

Step 5: Start Growing Your Blog


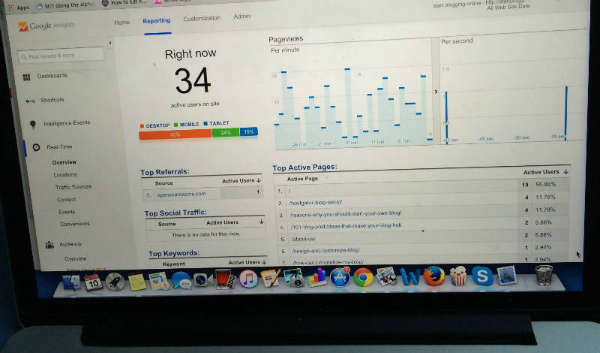
Analytics from StartBloggingOnline.com (taken from my personal laptop).
Now that you have set up your blog and know the basics, it’s time to make your blog successful. Many
beginners struggle at that point, thus I’ve put together a handful of guides to get you going easier.
If I were you, I’d suggest you to go and check my resource page here. It contains all the content that I’ve published on StartBloggingOnline.com over the past couple of years. It’s nothing too much, but enough to get you going and a bit more.

Pokemon Go Generations

Pokemon go Generations Lets first know about what are these Generations. The  Pokémon  franchise  revolves around 805 fictional speci...